Do you know how to connect multiple LED strips to one power source? Well, I have noticed that most suppliers of LED strip lights don’t provide clear and simple installation guide advice to their clients.
Many of them make the assumption that you already have some prior knowledge of the lighting devices before you go out of your way to purchase them. However, you may be completely new to the field, and you are buying them with the simple reason of impressing your cronies who will be attending your birthday bash over the weekend.
Plugging your LCD strips into different power outlets may not exactly be a hassle to the uninitiated, but you probably have most of your power sources occupied by the many electronics in the house. You still need to keep one or two free for charging your mobile devices. Besides, many people have a phobia of electricity, and the last thing you need is an aggravating tangle of electric cables across your living room.
Thankfully, you have nothing to worry about since this tutorial will guide you through a simple step-by-step procedure on how to connect multiple LED strips to one power source.
What do you need for this tutorial?
- LED strip splitter: This gadget provides the interface you will require for accommodating your multiple LED strips. It has several input ports where the cable from each of your strips plugs in, before making the connection to the power source.
- Screw-in terminal connector (male): Your full reel LED strips come with a 2.1 mm female plug so they can connect seamlessly to the screw-in terminal male barrel plug for power. What if the supplier doesn’t bundle your strips with a female plug connector? You may have to cut the male connector head off, and then connect the wires from the strips to the male connector directly before soldering them into place. You will need to ensure the mains supply switch is at the OFF position before you embark on this operation. Otherwise, the effect of the electric current that will course through your body when you handle the live wires might extinguish your desire for the ambiance of the LED strips.
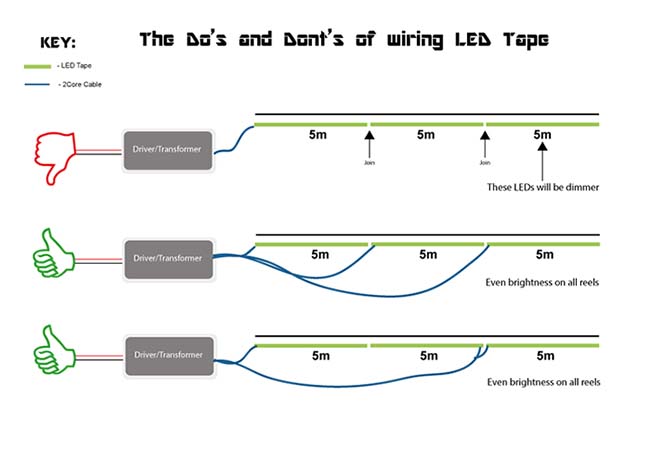
- LED strips: LED strips come in 5m reels, which is the maximum continuous length you can install without suffering from the voltage drop. However, you can extend this length by purchasing the 24-volt strips, which carry electric current more stable than their 12-volt counterparts. You need to check the power rating on your LED strips before proceeding with this installation tutorial.
Step-by-step instructions
Step 1: Determine the type of circuit to use
So, which one is better: series, parallel or hybrid? The power requirements of any lighting system determine the type of circuit to employ. You won’t need to worry if you have not been to an electronics class since the circuitry is fairly easy to grasp. The easiest circuit type you can use to fix your LED strips is the series mode.
The current in this circuit follows a single path from start to end. The positive end of one LED strip connects to the negative end of the next, and the series continues to both ends of the LED strip splitter which then plugs into the mains supply in the wall. The series circuit is also flexible as you can create almost any pattern with your strips.

You may also consider using the parallel circuit which means you connect the different strips in such a way that they share equal voltage from the power source. This type of circuit has the anodes of all the strips connected along the same cable while the cathodes connect along the other end of the line. A cable moves from one anode to another anode of the next strip.
The same procedure applies to the cathodes in order to set up the connection. This connection has the different strips receiving different currents and as such, their brightness may be slightly different. Alternatively, you can connect each individual strip to the splitter for uniform light output from the arrangement.
Step 2: Connecting the LED strips
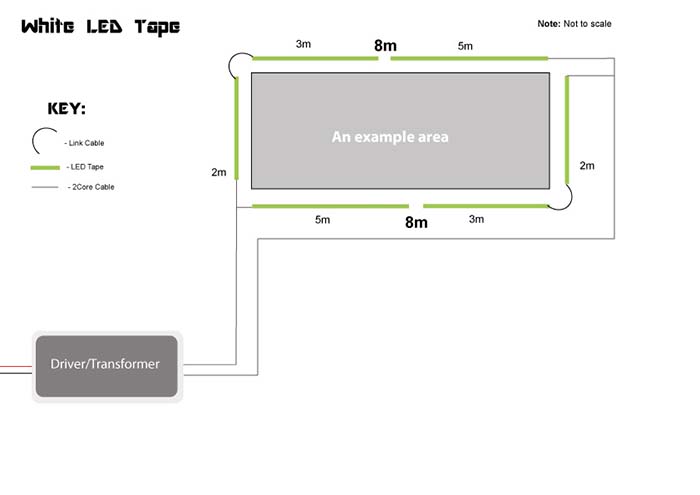
Learning how to connect multiple LED strips to one power source shouldn’t necessarily jade you if you opt for the series circuit. All you need to do is to identify the anode (positive) and the cathode (negative) ends of each LED strip. It shouldn’t be too much of a technicality since most LED strip manufacturers label those points accordingly. You will need to determine which shape you want the lights to take. The pattern may depend on the area or object you want to illuminate.
Having chosen your preferred shape, proceed to join the anode of the first strip to the cathode of the next until you exhaust all the strips you have bought. You now have a length of several strips joined together from end to end. You can now connect the ends of the series of strips to the 2.1 mm female plug that came with the equipment before plugging it into its male counterpart for powering.
Step 3: Checking the power requirements of the strips
You need to keep an eye on the power rating on the LED strips before you plug them into a power source. The total amount of power required is the sum total of the voltage needed by each strip in the series. Remember that in the series circuit, the same amount of current flows through from one end to the other, but the voltage will vary at each point.
Consequently, you will need to ensure that the power output is enough to power all the strips to avoid compromising on the quality of the light output. If the power outlet is too much, it may damage your strips, rendering them unusable. Take note that these strips are expensive, and you wouldn’t want to spoil your party by damaging them even before they have been of benefit to you.
Step 4: Placement of the LED strips
One factor to consider when placing the LED strips is the power source. Whether you wish to light up the hallway, the bookshelf or the kitchen cabinet, proximity to the nearest power outlet is of paramount importance.
It would be better to have the power source as close as possible to the placement of the strips to make for easy connections and to avoid using too much wire. The main purpose for the single source of power is to avoid creating a hideous tangle of cables in the house. Locating the nearest power source ensures a shorter cable hence reducing the possibility of tangling.

Step 5: Checking the connections
You aren’t looking forward to an electric accident. It may likely occur if the joints you have made between the strips on the connectors are not proper. Before plugging them into the mains supply, you need to go over each joint to check for errors in connection, loose joints, or any hanging wire threads. To be on the safe side, take your time to analyze each node to ensure that everything is perfect.
Some of the areas to look out for include the anodes and cathodes, and if they are in good working condition. You also need to check each of your LED strips for visible defects, which may be a pointer to something wrong in their general makeup. If you have done any soldering, make sure the solder is firm and solid to ensure a steady joint.
Step 6: Plugging into the power source
When you are absolutely sure that your joints are fail-safe, you can consider plugging in. but before you plug in, you should ensure that various devices are in place. Have the 2.1 mm female connector as well as its corresponding male counterpart to ensure a seamless connection to the power supply. Plug the female part into its male correspondent and switch on the switch to see if the strips light up.
If your connections are good and all the devices in good working order, the LED strips should light up brilliantly. Once you have the LED strips glowing brightly, you can switch them off and wait for the big day, or simply let them dazzle the night away.
Conclusion
Did you enjoy this tutorial? Well, this list is important to me because it helped me set up my LED strips without any problem despite having been a complete novice in matters of electricity. It is my hope that this tutorial goes a long way to help you since I have come across many buyers of these strips who are unable to set them up by themselves and have to incur additional expenses to hire a technician.
This tutorial not only saves your precious hard-earned dollars but also a safe and easy way to connect your strips at home. What do you think about this article? I would love to get any feedback from you. Kindly leave your comment in the comments section. If you liked this article, kindly share it to enlighten someone out there.

